Guitar Finishing
Can you paint a guitar with only using spray cans? Yes, you can!
I do a lot of guitar painting myself and a lot of people ask me how I do it. So I wrote a little piece on painting your guitar with ordinary spraycans. Of course, you can never get the result a specialized luthier gets, don’t even dream about it. But as Eddie van Halen showed us, you can get decent results. And since replica’s of his guitar fetch $20K+ …..
The three most important things you need for painting your guitar are: patience, patience, patience.
Really, don’t rush the job. Painting a guitar takes up a minimum of three months (only when your name is Eddie van Halen this is not true, story goes he painted it and performed the same evening, the paint was still wet).
There is a very good tutorial available on the net that you can buy for a decent price. It’s called ‘How to create a factory finish with just a couple of spray cans‘. Over the years, the author John Gleneicki made a couple of more issues, but as I don’t know the latest versions, I would recommend the original ebook.
Although I have a few remarks. Not all his approaches I feel are correct. But it’s true, you can receive results that are simply amazing. But it’s difficult and you will need a lot of patience and a certain perfectionism.
So what do you need:
Paint stripper
This is to remove paint, you don’t need it when your body and/or neck are already blank. Since guitar finishes are very durable, you have to get the real aggressive stuff (so avoid the environmental friendly paint remover).
Sanding paper in the grids (approx): 100, 240, 600, 1000, 1500 and 2000.
This you can get for cheap at your car parts shop. Maybe for the higher grids you need to buy from a guitar shop. The higher grids you don’t need that much. But you will need a lot of ~240 sanding paper.
Rubbing compounds/scratch remover
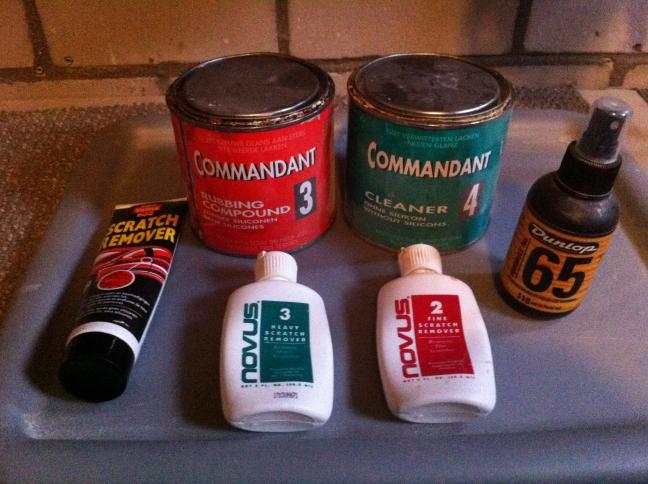
You can get the bulk cans from car parts shops, but I also buy from model building shops. In Holland you have a brand called ‘Commandant’. It’s relatively cheap. I also use Novus polishing products and Dunlop finish cleaning products.
Cotton rubbing cloth.
I use old white t-shirts. You will need a lot so start collecting!
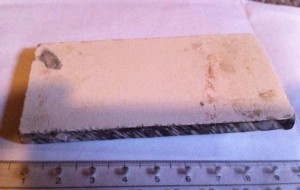
A sanding block.
A very important tool. You use it for sanding to wrap your sanding paper firmly around. This ensures you’re always sanding evenly. If you would solely sand by hand, you will sand ‘bumps’ into your body. Especially with grids 240 and 600.
I use a piece of a material called Trespa which is extremely durable. I use a piece of about 5x7x0,5 cm.
Masking tape.
Buy the best (read most expensive) you can get, e.g. 3M which is used for cars. A little investments pays off. Buy various widths.
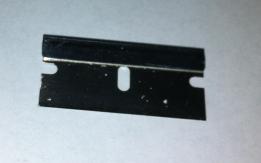
A paint remover knife.
The most underestimated piece of tooling for a luthier. You can buy the at your DIY by the tens.
Sharp knife
Always handy to cut masking tape, remove excessive glue or paint etc. I love Xacto knives.
Cleaning spirit (Naphtha)
A bottle will do. This stuff is amazing, it cleans and shows you how paint will look after you applied a clear coat. But don’t inhale it.
A good ventilated area (outside)
Best is to paint outside when it’s not raining or too hot. I like the painting frame you can use outside which you can see in the ML-Factory clips. Soon I’m going to build one myself.
A mouth protector
Not only to be used when spraying but also when sanding. Don’t inhale those nasty particles.
Wood filler
For solid color guitars I use two component wood filler as you would use for repairing wood in your house.
When you want to stain a guitar you will need filler that absorbs the stain just as the wood the guitar has been made of so you need to buy specific fillers from guitar parts shops.
Spray cans
OK, here it becomes difficult. You have a numerous amount of types of spray paint, e.g.:
- Poly-urethane
- Polyester
- Nitro Cellulose
- Acryl
- Alkyd
All have pro’s and con’s. Polyester can only be used by pro’s, but Acryl, Alkyd and Nitro can be bought at your local DIY or car parts store. After using Alkyd, Acryl and Nitro I can only say that Acryl paint is my favorite. It’s easy to handle and it doesn’t matter that much if it gives ‘drips’ since you can easily sand the surface and respray it. And the clear coat keeps it color (doesn’t turn yellow).
In Holland you can get the following spray-can brands:
- Motip: The one I prefer. It’s Acryl, cheap and easy to buy at e.g. Halfords stores (have a look in the car-paint section).
- Dupli-Color: also Acryl but a bit more expensive than Motip. Never used it but should be a good choice as well
- Flexa: Alkyd. This is what I used first. It is easy to spray and sanded but it has to major drawbacks, clear coat turns yellow and it isn’t very durable. It is super easy to handle.
- Trendy Colorline: nitro-cellulose, a sub-brand of Motip. Nitro is the paint of guitars from the 50’s/60’s so many people believe this paint will give you the magic vintage sound. I don’t believe the hype. Nitro is not that easy to handle, you should experiment a lot with it before applying it to a guitar. By the way, the nitro used in the 50’s is toxic and differs from the nitro sold nowadays.
For staining woods for bodies and necks you can use wood dye’s. You can either use the water or alcohol solvable versions. You can get them at guitar parts stores as solvable powders or in cans.
For necks you can also buy amber clear coat for that yellow vintage look. The more layers you spray the more yellow your neck becomes.
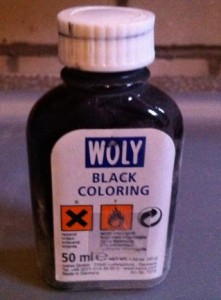
For giving fret boards that ‘ ebony’ look you can use black leather paint. Just black leather paint at you can buy at shoe repair shops. Don’t use shoe cream, go for the leather paint.
Ok, we gathered a lot of stuff, let’s go for it!
Step 1: Strip the body
If the body is not a blank, you have to strip the body. Sometimes the body is covered with a nasty sealer that feels a little bit sticky, I like to remove that by carefully sanding with 600 grid.
There are different ways of removing paint from a body, for guitars (bodies and necks) without binding I prefer to use a paint removing solution. Why not for bindings? The plastic binding will react with the paint remover solution and make the body or neck completely useless. For guitar parts with binding I would recommend to sand the paint off.
Paint remover: always take the most aggressive stuff. There is ‘environmental’ paint remover but that won’t do any harm against the ruthless thick paint that most guitar building companies use.
First remove all parts from your guitar body or neck. When stripping the neck, cover the entire fretboard with masking tape. I always like to get myself a shallow carton box in which I can lie the body or neck.
Get an big old brush, dip it into the paint remover solution and smear the solution over your body or neck. Use a lot of the stuff.
It takes a couple of minutes to react and after 20 to 30 minutes the paint gets loosened up. Now you can scrape the paint off the body. Use thick gloves and a metal paint knife to remove the paint. You will probably not be able to remove all paint, so you might have to repeat this process two or even three times.
After a while, most of the paint can be removed although there are always parts where the paint still sticks. You have to sand those spots away.
Use 120-200 grid sandpaper and wrap it tightly around a sanding block. Now sand the body by following the contours of the body. Using the sanding block will prevent you from making ‘holes’ in the body or neck. You want to keep the original contours of course. As a last step you can sand with grid 400-600. Never use water at this stage.
For the sanding method to remove paint (on guitars with binding) start with really low grids (like 60) to remove the upper layers of the paint. Also here use a sanding block and wrap the sanding paper tightly around it. You absolutely don’t want to damage the shape of the guitar.
In order to be ready to be spray painted, your object should never be sanded with a grid higher than 600. You don’t want a perfect smooth surface since the paint must ‘hold’ to the surface. 600 grid is really the finest grid to use a his stage.
Step 2: Fill up any holes
The will always little chips in the wood that you can’t fill up easily with primer. Best is to fill them up with a filling substance that they use for cars e.g. Bondo. Myself I prefer to use two compound wood filler.
Be aware that if you want to stain the body, the stain won’t ‘catch’ in the filler as it does in the wood. You can also buy special wood filler that stains like normal for example mahogany, although you will always see the difference. But only use car fillers when the body or neck is going to be painted in a non-transparent color.
Bigger holes or for example holes for hardware that you don’t use, can be filled up with wood. But be aware that if you fill up bigger parts with wood, the wood might expand differently then the body-wood. Most of the times you can see it. My tip is to fill bigger holes with wood but not completely. The top lets say 3 to 4 millimeters must be filled with two compound wood filler.
After filling any holes, you have to sand again (max grid 600, using the sanding block).
Clean the wood with cleaning spirit on a piece of cotton (old t-shirt) and let lie for a day to have the cleaning spirit completely resolved.
Step 3: Masking
Mask parts you don’t want to spray. For binding I have two approaches contrary to what most guides say e.g. the ‘How to create a factory finish…’ ebook.
- Body and headstock binding: this is done in two ways. The side edges I always mask off to get crispy lines. The surface (top) I never mask but always spray over followed by scraping the paint away because the binding on top of the body/headstock is very hard to mask because of the rounded contours.
- Neck binding: neck binding I always mask off with very good (3M) masking tape because its almost impossible to have straight sharp lines when scraping paint away.
After the paint is dry, you remove the paint on the binding with a small paint removal knife.
As noted before, use the best, probably most expensive masking tape you can put your hands on. It will save you so much time and the results will be astonishing.
Step 4: Applying the primer
For bodies and necks (and head stocks) that are going to be sprayed in a solid color, I would advise to first spray a primer. For a final color that is light (white, yellow etc.) use white primer, otherwise use grey. The primer will soak into the wood so you don’t have to use your more expensive final color. Primer has also a little bit thicker structure so it acts as a filler.
For spraying, there are a few techniques for holding the object:
1. Attach the object to the ceiling and make at the bottom a point (e.g. a big screw in the strap hole) where you can hold the object. This is how I learned at the guitar builders course. Not always suitable in a small space and for heavy objects.
2. Attach a ‘holding’ stick to the body (in case of a bolt-on neck) to hold the body with one hand or use the ‘masked’ neck doe this. With the other hand you hold the spray can. This method is mostly used. See the ebook.
3. Lie the object down on a work bench and spray from above. I like this method a lot since the object lies completely stable and you can walk around it. Drawback is that you can’t spray front, sides and back in one go.
Whatever method you use, hold the spray can at 20 cm from the object, start in the left upper corner and move from left to right. When at the end, make a new pass from right to left. At the end make a new pass from left to right etc.
Make sure that each pass partly covers the previous pass. When you have done the whole object, turn the object around (method 1 and 2 only) and do the same for the back. When the back is done do the same (short passes) for the sides.
Your object is completely sprayed now, hang it away to dry for about 20 minutes in a well ventilated area.
When there are any drips, ignore them and let them dry.
After 20 minutes or so, he paint is dry until the point that small particles won’t get stuck in the paint anymore. you can repeat he spraying routine.
For a good primer coat, I would suggest to repeat this procedure at least 3 to 5 times. After his let the paint dry for at least 3 days.
After 3 days the primer should be completely dry. You can now sand the object with a sanding block and using grid 120 to maximum 600. Sometimes drips needed a lower grid e.g. 60 but please use it sparsely. Also here I wouldn’t use water. Sanding particles that clogged up the sanding paper can be best avoided by once in a while hit the sanding lick on your workbench.
For sanding the sides you mostly can’t use a sanding block. The trick is to use a (approx 5 mm thick) piece of rubber like sanding block that can follow the curvature of the sides.
After sanding you can decide to spray an extra layer of primer, e.g. in case you sanded away too much paint and the wood is visible. Just repeat the procedure as many times as needed until your object is covered with a even coat of primer.
Step 5: Applying the color paint
Spraying the (solid) color paint goes exactly the same as spraying the primer although you have to be more careful. With the primer you can sand and respray but for the solid color that’s not what you want. Go for the minimum amount of passes in order to get a beautiful solid cover.
A typical mistake is that the ‘horns’ of a body are not sprayed well
When staining necks or bodies, mask the parts that you don’t want to stain with masking tape. Prepare the object by sanding it lightly with 600 grid. Use cleaning spirit to remove dust and to check if the stain will catch everywhere. Glue stains will show when you cover them with cleaning spirit. The glue stains have to be carefully sanded away without damaging the contours. Let the object dry.
Wear gloves when applying the stain, even with he water based because it gets everywhere (under your nails…). Do it carefully but fast and in an even way so the stain is evenly spread over the body giving a regular result.
When spraying head stocks I always make sure that there are no sharp edges by sanding the contours of the headstock to make the round. This gives a professional result.
A tip when spraying a metallic color, spray the last past further away from the object. Metallic paint is very hard to spray anyway so you should have some experience. And most important, metallic paint can’t be sanded so your last pass has to be perfect!
Step 6: Applying the Clear Coat
Except for stained and metallic colored object, you can sand the solid color lightly. You can use water now to get rid of dust. But never use grid higher than 600. Make the object clean with cleaning spirit and let it dry.
Also the clear coat is applied the same way as primer but clear coat is even more difficult to spray. It’s not really the spraying technique but you are likely to forget areas. That’s why I recommend to spray more layers around the sides and parts that stick out. The idea is that by sanding and polishing you will make the clear coat perfectly smooth to get that pro-finish. You will sand the clear coat partly away so there should be enough clear coat everywhere.
I also recommend to sand between about 5 to 10 coats of clear coat. You will often see that the clear coat doesn’t ‘catch’ at certain spots. By sanding in between spraying layers you can detect those spots and even them with the surrounding area. This may take more time but it is so much harder to make an even coat of clear when you only sand after the last clear coat.
Step 7: Sanding and polishing
I find this the most difficult part of guitar building but also the most rewarding. Get your sanding block and sanding rubber block out and start sanding with 160 – 240 – 600 grids (from 600 use water with a little bit of detergent). Be very careful since these grids can change the contour of your body or neck.
Then move on to grid 800 – 1200 – 2000. Again use water with detergent. As with the lower grids you will feel that first the sanding goes tough but with each pass is goes smoother until your sanding paper ‘flies’ over the object. At that point you have to move to a higher grid.
Once in a while check the object in the light to see if all scratches are gone. It takes some experience to decide what scratches must be gone with what grid.
It may happen that you find little ‘holes’ in the clear coat. These can be spots where the clear coat wouldn’t catch or were caused by air bubbles. You can fill them with some clear coat. Spray some clear coat in the spray cap, let it dry for about 5 minutes so the paint becomes ‘sticky’. Then take a tooth pick and put some of the sticky clear coat in the hole.
Let it dry (yes this will take a few days) and continue sanding. You can also do the filling with super glue but only for small holes in the lacquer. Bigger quantities of super glue won’t dry. There is a trick of having the glue drying by spraying some chemicals (super glue accelerator – check the internet) on top of it, but that’s for the pro’s.
If something goes wrong and you sand through the clear coat, you have to apply the clear coat again. Sand the whole object with grid 600 and start the process again. It’s an awful job!
After sanding you must polish the object with rubbing compound. Use a piece of clean cotton cloth (old t-shirt) apply some of the rubbing compound to the object and start and start polishing. Polish until all rubbing compound is gone. When you have polished the whole object start with a finer rubbing compound.
The different rubbing compounds I use are:
- Car Scratch remover
- Commandant 3
- Novus heavy scratch remover
- Novus fine scratch remover
- Dunlop Polish
Now you’re finished! Look at the beautiful results!
Specialties
A very good site to check is Project Guitar for some nice finishes. Below I have listed a few of my (future) projects.
Special patterns
Of course we have to dedicate some space to one of the most famous guitar finishes, the ‘Frankenstein’ finish made by Eddie van Halen. A couple of years ago I bought a music man EVH guitar kit and decided to finish it in the ‘Frankenstein’ colors. For this I used the ebook from Gleneicki for he first time and it id help a lot.
For the ‘Frankenstein’ finishing you first have to paint the guitar completely black. Next step is to tape the guitar, wherever you put the tape, the black will remain. Buy the most expensive masking tape at your DIY or car parts store you can get your hands one. Those few bucks more will, save you lots of time and frustration.
Buy several widths of masking tape. If you need a width that you can’t buy, cut masking tape with a metal ruler and an Xacto knife. Apply the tape to the body and really push it hard on the body. Pay extra attention to the places where tape crosses, push them extra to the body.
Then paint the body white. Don’t use too much paint in one go and spray dead straight on the body. Don’t use much paint but make sure that the white color covers well. You will need about 3 or 4 passes. Then let the body dry for a couple of hours. Next step is difficult, the masking tape needs to be removed. This is very tricky because the masking tape is still wet and can make stains. First pick the masking tape that lies on top. Lift it with a Xacto knife and carefully remove it from the body. Then continue with the next tape.
Now you have ended up with a white guitar with black stripes. But you will see places where the white paint got under the tape causing not crisp and clear lines. You have to fix them by scraping the white paint away. First wait until the body is dry, I suggest at least 3 days.
For that EVH look you need to spray the body red. Now you have to mask the black stripes again with exactly the same width of masking tape that you used for masking when spraying white. Therefore I like to use masking tape in various fixed widths. Carefully mask the black stripes again. Then you have to mask what will become the white stripes. After carefully pressing the masking tape to the body you can paint the guitar completely red. Normally the red color covers well so 3 to 5 passes will be enough.
After that remove all masking tape, let the body dry and then scrape away red paint wherever it got under the masking tape.
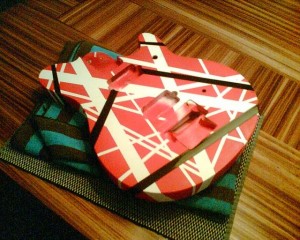
After praying the red color you must spray the clear coat again as described above. You end up with a beautiful EVH body!
Sparkle top
Have you ever looked at the beautiful sparkle tops on Gretsch guitars and do you want to make one yourself? The secret is that these tops are made from drum kit wrapping. Remember that Gretsch also made drum kits and I presume that the guitar factory once came up with the idea to use the drum wrap on guitars.

Not only drum wraps are used for guitar tops but also as side binding, have a look at a Gretsch White Falcon and the orange sparkle side bindings. I never did a full sparkle top, I only used drum kit wrapping for the side bindings of my White Falcon replica.
Chrome
Go Joe Satriani style with a chrome guitar. I got in touch with a car painter who was able to do the job for me. Only one thing, those chrome finishes are very tough and not made for being sprayed on a material like wood. Wood shrinks or expands due to weather conditions and your chrome finish can’t handle that giving all kinds of cracks.
Ibanez also found this out. In fact Joe’s original chrome boy is partly covered with transparent tape to prevent the chrome from falling off. Ibanez continues the chrome boy series making use of luthite bodies. Luthite is a “plastic” that has similar resonance capabilities as wood has. Good thing about luthite is that it won’t expand/shrink.
So when you have plans to make a chrome guitar, use a non-wood (luthite or whatever material) body.
Paint
Not spray paint but real paint. Check out my Fool guitar replica to see how this is done. The trick is, use a lot of clear coat!
Fabric
The famous Steve Vai flower pattern Jems where made by covering the guitar body with printed fabric and finish with a lot of clear coat. Haven’t done it myself but there are many guides how to do it. Again, for getting a good result you have to use a lot of clear coat in the end.
Multi-color
Another one of Steve’s favourites, the multimcolor Jem. Also knowns as swirl finish. This effect is reached by making a mixture of paint, water and Borax. There are many guides and instructions available on the web.
Veneer
One of my next projects is to make a Prince ‘Madcat’ Telcaster replica by using an ordinary cheap telecaster kit and maple and walnut veneer. Keep coming back for updates on this subject.
Sunburst
Sunbursts I have never done. There are a few good guides that show you exactly how you can do them. A tip that one heard is to use not too dark colors (never black) as the outer color. A have plans to do a sunburst pretty soon so I’ll keep you updated.
Relicing
Relicing sometimes seems to be a complete religion. I did some relicing once but it didn’t turn out well. Still I want to finish this project (a SRV stratocaster), I’ll keep you updated!
Logo’s and decals
For decal’s I use decal paper that is used for model building. You can get it on the internet from different sources.
There are two types of decal paper:
1. transparent
2. white
I mostly use the transparent paper. The white paper is used when you need a ‘white background’.
First I design the logo in a graphics program (like the freeware paint.net).
When the logo is finished, make a vertical rotated version of it.
Print the logo on decal paper. For black head stocks, make sure there is some black around the logo. I prefer using a laser printer since the black is more black and the overall result will be better.
Then I fill in colors like silver or gold (those colors that you can’t print). Use a very thin layer.
When the colors are filled in, I spray a little bit of clear coat over the print. Just to make the colors stable. I normally spray around three very thin layers.
Prepare the headstock by sanding is carefully (600 grid) and cleaning it with cleaning spirit.
When the clear coat has dried for about 24 hours, carefully cut the logo out. Make a bowl of hand-warm water and carefully put the logo in the bowl. After about 20 seconds the logo will come loose from the base paper.
Carefully put some drops of water on the headstock. The pick the logo from the water (pull it from the base paper) and lie it carefully on the headstock. Since there is a lot of water you can move the logo around until it’s in the correct position. Now get some high absorbing paper and let the water being absorbed by the paper. Leave some water, it’s best when the logo dries naturally to the headstock.
Wait about 24 hours until the logo dried up. Now use about 10 very thin layers of clear coat to settle the logo to the headstock.
There is one thing you forgot — but so has everyone else so far too which has been a bit frustrating for me — and that is: what to do about the tiny bubbles on the surface after spraying a coat on.
I can’t very well apply lacquer over them as that just locks them in forever… and when I lightly sand them out it inevitably changes the look of the surface texture in those areas. SO I need to respray. Then more bubbles. SO I sand….
And on and on goes the freaking project that never ended.
Do you have any advice for this dilemma? 🙂
Something you’re doing is causing the bubbles.
Maybe you need to wipe the surface down with a cleaner first.
bubbles are not normal
could it be you’re using 2 different types of paint?
Some paints clash
Hi Jay,
Sorry for the late feedback. When I see tiny bubbles in the paint I stop applying the paint and sand them away with 600 grid sandpaper. After that I continue applying paint but it seems that you have already tried this.
So most important is to find out why the tiny bubbles popped up. Most likely it is a reaction between the different layers of paint. I remember I had a similar issue once with a specific brand of nitro cellulose spray paint. I had to spray different layers with only limited time between the layers (waiting for more than 2 hours would give a reaction between the layers). But other brands (like Motip) of nitro don’t give this issue at all.
So you can try limiting the time between spraying layers to for example less than 20 minutes or switch to another brand of paint.
Good luck!
Ed
I recently painted a Kramer guitar body black using nitro paint and a nitro clear coat. I wet sanded and buff polished it with rubbing compound and it looks great. this thing has been drying for a month now but any time I handle it, it leaves scratch marks and I need to rub it out again. Is there some kind of wax i should use so it wont do this anymore??
I’m refinishing a guitar I previously built. The Body is a Padouk back and Koa front. These woods are beautiful and I’ve always had it clear coated. In short I’m trying to do the finish myself this time. “ I use to work building Parker guitars” and was in the finishing dept. Sanding, wet sanding and polish. But I’ve no idea on how to spray.
I want to seal and clear coat this properly so I can wet sand and Polish. Can you tell me what I should use/get that is in spray can preferably ? I can sand and polish and know my woods etc. I’m struggling to find a product that will seal and allow a clear coat to stick. HELP!