Electronics And Shielding
Without electronics, your guitar won’t give any sound so lease pay attention to this part.
I will only pay attention to the basics of guitar electronics and tell you some tips and hints. For more specialized subjects such as pre-amps and active pick-ups please check other sites such as www.guitarelectronics.com and www.diyguitarmods.com.
Well, what do we need:
- A soldering station: you need one with adjustable heat
- solder: any electronics solder will do (don’t use solder for plumbing)
- wires in different colors
- isolated wire: have at least three colors black, white and red.
- a wire cutter
- shrink tube: small and medium size, as an alternative to isolation tape
- a lighter: for shrinking the shrink tubes
- a simple electronic meter: years ago I got myself one of the most advanced models available, but I only used it in the ‘diode’ mode to check if there is a connection or not between two points. A simple 20 euro model will do, but check for the ‘diode’ function, it should be there.
- shielding paint: you can get them at Stew Mac
- a piece of cardboard to keep potentiometers and other parts in place
- an old towel with a hole in it for shielding your guitar body when soldering
- and most important quality parts. I spent months looking for an error in a circuit only to find out that my jack plug was broken.
Another important tip: don’t use any cleaning fluids like S39 that are used in plumbing. This stuff is nasty and will cause corrosion. Corroded points will not pass electronic signals so your guitar won’t work after a while. When you need to clean parts, e.g. a potentiometer, use sanding paper or medicinal alcohol.
Step 1: Pick the electronics scheme.
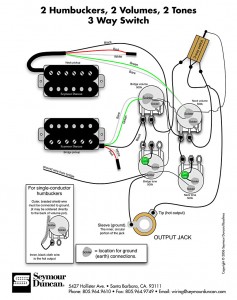
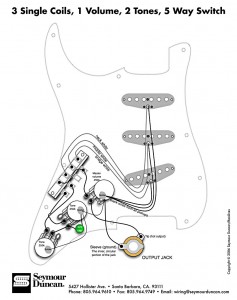
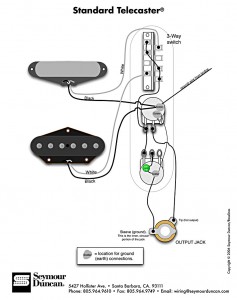
For stratocasters, telecasters, Les Pauls, SG’s etc. there are many schemes available. Below you can find the standard schemes for the strat, tele and Les Paul/SG. There are of course many variations with additional options such as phase shifters, you can find these at specialized sites.
A great source is the Seymour Duncan website, they have a lot of wiring diagrams that are clear and easy to browse. I have copied from their site the three most popular.
Step 2: Prepare and check the parts
Check all the parts you are going to use. Does the jack plug work? do the potentiometers work?
How must the pick ups be connected? etc. etc.
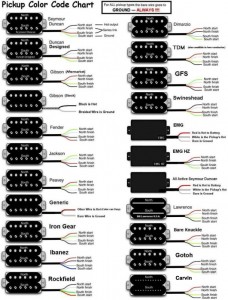
For the pick ups, different color codes exist per brand to make it more complex than its is already. This table below shows you the most popular color coding.
Especially for expensive pick-ups, I like to keep the lead wires as long as possible. This will enable you to install them in other guitars. When I’m not using the phase shift wires, I solder them together and attach them to the lead wire with a shrink tube. This works far better than using isolation tape and looks more professional. Just pull the wires through a piece of shrink tube and shrink the tube by carefully holding a lighter under the tube or use the tip of your (hot) soldering iron. The heat of the lighter or the soldering iron will shrink the tube. Don’t use too much heat, the tube will melt.
Leo Fender made it quite easy for us to do the electronics of a strat or a tele. All parts are connected to the pick guard, so you can do almost all soldering on the pick guard.
For les Pauls and SG’s it’s more complex. You have to solder in the body from the back. To make life easier you can use a piece of card board (or plywood) that has holes drilled at the locations where the pots should come.
Install the pots through the holes and solder all electronics. When ready you can remove the electronics from the template and put them (carefully) in the electronics cavity of your guitar.
Step 3: Soldering
Have your (checked) parts ready. Switch on your soldering station and let it heat up till around 80% of it’s capacity.
We first solder the wires, starting from the ground wires on the pots.
When soldering, the rule is to use as less solder as possible: more is NOT good.
Heat up the parts for a few seconds, the carefully hold the soldering tip against it in such a way that the solder ‘flows’ over the parts. Then remove the soldering tip and solder.
A soldering connection should be flat and dull and not bulky and shiny. Put all your parts in a template or on the pick guard and use both hands when soldering. One for the solder and one for the soldering tip. When solder doesn’t ‘catch’, don’t force it by using more solder or pressing but remove the part from your template and clean it with sanding paper, alcohol or naphtha (be careful, alcohol and naphtha are inflammable).
I always like to sand the back of the pots to remove any grease. Then I write with a pencil on the back what the function of the pot is (T1 is Tone 1 , V1 is Volume 1 etc.). First solder the ground wires, then the signal wires and then the wires from the pick-ups.
Now all the wiring is done. Reduce the heat of the soldering station to about 50-60% to solder the tone caps.
Caps are very vulnerable to heat so you should solder them quickly on a low soldering temperature. Install the tone caps correctly and apply the solder.
Step 4: Check on the template.
Just run through the whole schematics. Check all wires and all sodering joints.
Step 5: Install electronics in guitar body
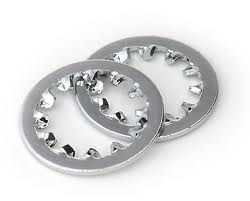
Be careful not to harm the paint. Use lock washers for your pots and switches.
Step 6: Connect the pick-ups, output jack and ground from the bridge.
Your guitar should be producing sound now!
Something about guitar electronics parts.
Potentiometers (or simply pots) are the ‘knobs’ that you use for volume and tone. They come in different values, sizes etc.
values: most popular pots are the 250K Ω (250 kilo Ohm) and 500K Ω values. The 250K Ω are mostly used for single coils, the 500K Ω for humbuckers. 250K Ω pots give a slightly warmer tone. Other values like 25K Ω are used for active pick-ups. Most of the time 25K Ω pots are delivered with the pick-ups.
The way of building of resistance when turning the pot (aka ‘ audio taper’ ) is either logarithmic or linear. For tone, linear pots are preferred since with them you can control the sound color best.
On the other hand for volume, logarithmic pots are preferred above linear pots since our hearing works logarithmic which means that a logarithmic pot ‘sounds’ linear. But there are guitar players that prefer the fast action of a linear volume pot (e.g. for volume swells) so they install linear pots for volume.
How can you see that a pot is linear or logarithmic?
- Logarithmic: A on the housing (from ‘A’udio, since logarithmic pots are mainly used in audio equipment)
- Linear: B on the housing.
Again, life isn’t that easy, these are the latest indications but on older pots it is the other way around (‘A’ is linear, ‘B’ is logarithmic). When buying pots, explicitly ask for it. When you already have pots and you are in doubt, measure the resistance. A 500K linear pot will have a resistance of about 250K when turned halfway, a logaritmic pot around 390K.
Size: Pots come in two sizes, the ‘big’ pots also called ‘American-size’ models and the smaller ‘Japanese-size’ models. Please watch out since the diameter of the shafts are different, so the holes in the guitar body dictate what size to use. Also not all knobs fit on the different pot sizes and the electronics cavity in your guitar body can be too small for the big models.
Of course there is the question, what’s better the big American or the smaller Japanese sized pot? Personally I don’t care. If I was to build a guitar from scratch I would use high quality smaller ‘Japanese’ ones.
I once made pot holes wider to fit the bigger American models and I can tell you that it wasn’t worth the effort. I almost ruined the beautiful top of my guitar. Please don’t do it, just buy quality (small) pots.
Something about the quality of pots. For a while I was tempted to buy cheaper pots (around $2 a piece) instead of more expensive pots (6$ a piece) until by accident I had both types (cheap and expensive) in the same guitar. What a difference in handling! The more expensive pots have an almost velvet-like way of handling which is absolutely worth the extra money. So please spend the extra bucks on more expensive pots. Most popular brands are CTS and Alpha. There are vendors that offer pots up till $50 a piece with so-called ‘military specs’, but I have never tried them. And honestly speaking I don’t think these pots are worth the investment.
A guitar with a curved top, like a Les Paul, is likely to use long shaft pots. Simply pots with a taller shaft. Have a check if your guitar needs them but some Les Paul like models have extra piece of the body routed out so also normal length shaft pots will fit.
Split- or solid shaft: Yet another option, a solid shaft or a split shaft. In general split shaft pots are sold, but sometimes you find them with a solid shaft. Solid shaft pots are mostly used for knobs that are secured with a screw. Split shaft pots for knobs that are pressed on. When you need to put a knob with a screw on a split-shaft pot, make sure that the screw goes into the split, otherwise you damage the shaft by putting pressure via the screw on one part of the shaft
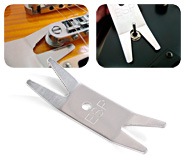
When installing pots, always use besides mounting nuts also mounting rings and lock washers. If you don’t, you will feel movement in the pot when you turn it. For securing the mounting nut I like to use a handy tool from Stew-Mac: the ‘Multi Spanner’.
Capacitors types and values:
When you love guitar myths, capacitors will be your favorite subject. No other part of a guitar has been subject to so many tales and stories. Absolute fortunes are paid for original Sprague ‘Orange Drop’ caps. In general there are three types used for passive tone control in guitars:
- Ceramic
- Film
- Oil/Paper

There is a lot of discussion going on in the guitar world about which are the best. In my opinion it doesn’t matter. To be honest, I hardly use the tone knob on guitars and I can imagine that Eddie van Halen just ignored the tone knob. Use 0.22 μF (0.022 mfd) capacitors for with humbuckers and 0.47 μF (0.047 mfd) caps for single coil pickups.
Treble Bleed: this is a modification to fight the effect that if you turn your guitar volume down, the sound starts to sound less bright and more muddy (and more bassier). This is caused by the capacitance of the guitar (potmeter, wire, guitar cable) which creates a low pass filter and therefore cutting the high frequencies.
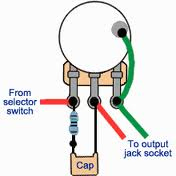
You can prevent this effect by soldering a 130K resistor (the small 0.25 Watt version) and a 0.0012μF capacitor in series between the two not grounded terminals of the volume pots.
Grounding and Shielding:
Guitar electronics are subject to electromagnetic radiation from outside. This radiation can cause noise in your electronic circuit from your pick-ups to your amplifier.
Most important is to ground your guitar and equipment correctly. Basically there is one golden rule: all ground wires end up to one single point. For guitar electronics this point is mostly the back of a potmeter. This point is connected to the ground shield of your guitar cable which is connected to the ground of the amplifier. And the ground of the amplifier is connected to the ground of the mains socket. This goes the same for your other devices such as effects, peddle board etc. All are grounded to the same mains socket. If one of the devices in your chain is grounded in another way, you have created a ground loop which will cause a lot of hum.
The only thing I do to optimize shielding is paint the pick-up cavities, electronic cavities and cavity covers with conductive shielding paint. This is water based paint that contains metal particles so it is conductive. The conductive paint creates a ‘Faraday cage’ that protects against electromagnetic radiation. Make sure that the conductive parts of the cavity and the cavity covers touch each other.
An interesting story from a few years ago. My brother had to play in a bar and when he was doing the set-up, his guitar was humming horribly. Since he was playing my guitar, I thought I made a mistake in wiring so I started to disasemble the guitar to check for loose wires. I found nothing. After going through the whole loop of effects, cables, amps etc. we found out that the light above the emergency exit caused so much electricmagnatic radiation that every instrument near it would hum like hell.
It is great to have a site that helps us better understand the ways hows and whys our electric guitars work which saves us much if we can fix a simple problem in lieu of taking it somewhere for who lnows how long and how much. But what I would really like to see is a diagram of the different 5-position switches that are out there that do not show the numbering sequence of the points. Maybe I am slow and there is an easy way to identify them in order to do a basic factory wiring of a stratocaster SSS HSS, etc.
I am pretty new into the wiring of guitars and what each piece does and the difference a 250W pot is to a 500W pot in relation to the impact on the sound or lack thereof.
In addition, I am looking for a simple diagram for a Push-Pull Volume pot in a basic wiring diagram for a SSS stratocaster. I saw one drawing and wired up my strat exactly the way it was drawn but I obviously didn’t understand enough to know why nothing worked. Hope this isn’t too confusing for a response. Again, I appreciate everyone who has taken the time to write articles to help those of us trying to learn.